Monday, March 31, 2008
Where have all my pictures gone??!!
Apparently every project I had linked to from 2ps is now pictureless. It looks like 2ps itself is down... Hmmm.... Maybe I'll just delete the nasty comment I got about not posting pictures with my tutorials, since I did and it's just not showing up because 2ps is down. No sense leaving it there to make me sad, eh?
Saturday, March 29, 2008
Guess Where I'm Blogging From?
My new computer corner!!
That's right... Leif fixed me up with a computer, monitor, and keyboard that lives in my own little craft room! I don't have a mouse right now, so it takes me a little longer to get around the world wide web, but he showed me some magic shortcuts that make web browsing uber cool and easy, so I had to share! I probably won't use this computer too much until I get a mouse, but the excitement wouldn't be contained.
And so I say, "Goodnight!" from the computer corner of My Inner Martha's craft room.
Friday, March 28, 2008

Thursday, March 27, 2008
I didn't get much done at Craft Night....
... but it was a total gab fest and we had a great time. I went over around 6:30 and ate dinner with Stephanie (since Neal and the kids were coming down to our house to make dinner with Leif and Ellie). Then we crafted for a bit before Michael and Dara showed up. The four of us crafted and gabbed until Erika arrived, and then the party was in full swing!! It was after 11 when Erika and I finally left Stephanie's house. We just got to talking and completely lost track of time! Good times...
Wednesday, March 26, 2008
Holy RAKtastic, Batman!!

I just have to share this great RAK I got in the mail yesterday from Sandy! It is full of such fun goodies... I can't wait to play! (especially with that unmounted elephant stamp... you can't see it in the picture, but it is awesome!)
Tuesday, March 25, 2008
WILD CARD CHALLENGE!!
A week has passed and it's time for another challenge... aaaaaaand it's WILD CARD week! So this week I want you to:
And don't forget to link here and show me what you make!!
Create a shaped card.
Any shape other than square or rectangular!
Any shape other than square or rectangular!
And don't forget to link here and show me what you make!!
Sunday, March 23, 2008
Make your own "Primas"
THIS is so very cool. I will definitely try that next time I need paper flowers! And what a great way to use up the handmade paper scraps I have been collecting from so long ago...
Saturday, March 22, 2008
You Make My Day Award!

Stephanie Severin over at Inenious Inkling gave me the You Make my Day Award!! Thank you Steph! I'm passing it along to five bloggers who make MY day...
Check out...
Julie at Out to Impress
Tam at Tam's Treasure Box
Susan Beth at The AJB's and Me
Jana at From My Feathered Nest
Julie at My Life
Thank you so much for making my day!!
Friday, March 21, 2008
When worlds collide....

Do you remember when I said that my favorite store in downtown Bozeman was Fancy Flours? Well, it's still up there. Tied for favorite with Ro Sham Bo. Well, it turns out that I'm not the only one that fancies Fancy Flours...
According to this article from the Bozeman Daily Chronicle, Fancy Flours is going to be featured during "Cupcake Week" on.... you guessed it!... MARTHA!!!
How exciting!! I am super excited!! It will air the first week of April, so nobody call me Monday through Friday from 11 to noon mountain time. I'll be perched in front of my TV waiting to see two of my favorite worlds collide!
Thursday, March 20, 2008
Hard Boiling Eggs....
I'm hoping to dye some Easter eggs with Ellie today or tomorrow. In preparation, I am hard boiling eggs. Suddenly it occurs to me that I don't really hard boil eggs very often. Rarely, in fact. And I can't remember how to do it. So I'm trying a method I've never done before. I found it on WikiHow and thought I'd give it a shot. Have any of you used this method before? In about 10 minutes we'll see how well it works...
From WikiHow:
From WikiHow:
(Note: this method consistently produces a perfectly-cooked egg with lovely, all-yellow yolks--no more green-gray rings!)
- Place the raw, uncracked eggs in a pot. Fill the pot with enough cold tap water to completely cover eggs with about 1 inch of water over them. Add plenty of salt to make the egg easy to peel later.
- Bring to a rolling boil on high heat. Once the water is brought to a good boil, promptly cover the pot and turn off the heat {the retained heat in the water and pot will continue to gently cook the eggs without overcooking them and discoloring the yolks}.
- For hard-boiled, leave the eggs in the water for 15 minutes; for soft-boiled, leave them in no longer than 10 minutes.
- Remove from heat and immediately chill the eggs by placing them under cold running water or in a bowl of ice water to stop the cooking process. Chill for a few minutes until the egg is completely cooled.
- To peel, crack the shell around the entire egg and remove.
Tuesday, March 18, 2008
The Butterfly Phase
I've been in a butterfly phase lately. It seems like all my projects are laden with them. Don't get me wrong... I love butterflies! And I'm still not done with the butterflies, most likely. But I just want to demonstrate why it's good that I'm not a chronological scrapbooker:


The curtains are up...
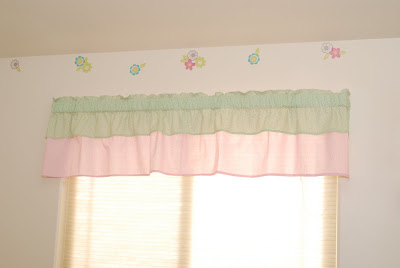
... and here's what they look like! Now, before anyone gets too critical, let me lay out my theory on sewing. I DON'T sew. My brother sews. He made my wedding dress when he was 17 years old. You just don't compete with genius like that. So most of my sewing is done on paper - you know, scrapbook layouts and cards. That kind of stuff. It's rare that I actually sew fabric, so when I do it has to be a project that:
1. Has no pattern. I don't believe in following patterns. Not for sewing, not for knitting, not for crocheting. Call me a free spirit, but I don't follow patterns.
2. Doesn't require measuring. I'm an eye-baller. I don't measure things, I just give it a good looking over and hope it fits. The curtain fits!
3. Can be sewn without pinning first. I think pinning things is a waste of time, for the most part. So when I sew I just want to line up the fabric and feed it through the machine. If I can't do that with the project at hand, chances are the project at hand will end up under foot and unfinished in a corner somewhere.
And this is why I don't sew very often. But I wanted a valance for Ellie's room, so here it is. I have a grand scheme for enhancing the window dressings, but you'll just have to wait until later to see if I actually get it done. One thing at a time....
Card Challenge!
A simple one this week....
To help me kick this stupid fever that is STILL hanging around (I can't seem to get it to drop below 100*) your challenge this week is to...
The sky's the limit - it just has to be a Get Well card! Help me kick the bug and post a link to your creations!
To help me kick this stupid fever that is STILL hanging around (I can't seem to get it to drop below 100*) your challenge this week is to...
Create a Get Well card!
The sky's the limit - it just has to be a Get Well card! Help me kick the bug and post a link to your creations!
Monday, March 17, 2008
Feeling Better...
While I'm not completely 100% today, I am feeling better. My temperature is down to 100 today and I'm not nearly so achy, so I think I'm on the mend. Woohoo! I have been taking it easy, but I haven't wanted to spend all day in bed (though I'm still in my PJs at 2:00 in the afternoon!), so that's good. I even got some crafting done today! I made curtains (a valance, really) for Ellie's room as we transition from the yellow and green nursery to a pink and green flowered toddler room!
Speaking of Ellie, she's sleeping soundly and has been since about noon. I suppose she'll be up in an hour or so. But Leif is working from home today, just in case I need help with her. I love that his job is flexible enough to allow for him to do that. Leif's brother Eric is also here today, so he's been playing with Ellie and keeping her occupied.
I'm still bummed that I won't get to see Taylor's babies today, but I will get to see them once I am better. I did get the call this morning that beautiful Etta and Evelyn are here, safe and sound, and that everyone is doing well! So congratulations, Taylor! I can't wait to see them! (But for your sake, I WILL.) =p
Okay, well, now I'm climbing back into bed to rest a little before Ellie awakens. I'll post pictures of the curtains once I get them up.
Sunday, March 16, 2008
You know I'm sick...
... when I don't feel like crafting. That's something serious going on, let me tell you.
I started feeling achy last night. My joints hurt. I felt tired and slept in today until almost 11. And I was cold. Today I got up and felt better. We went out to lunch with Leif's brother, and I didn't want a sandwich. I didn't want a Pickle Barrel sandwich. That's sign number two that I'm sick. I settled for some soup and enjoyed it thoroughly. By the time we got home, though, I was feeling achy and woozy again, so I headed back to bed. And I stayed there until dinner, freezing, all covered up with my blankets. I got up for dinner and ate about 4 bites of a glorious steak Leif grilled. Then I went back to bed. I ache, but as long as I stay laying down, I don't feel woozy. Really, I don't feel that bad at all, except for being COLD and achy.
I called my mom tonight to chat a bit and she, like any good mother, told me I should take my temperature. I poo-pooed the idea, of course. I only feel mildly bad, and if I admit that I'm sick, I won't get to go see Taylor's babies, who will be born tomorrow. But, I did take my temperature as soon as I got off the phone. And wouldn't you know...
I AM sick. My temperature is 103.1. I took it twice and even had Leif take his to check the accuracy of the thermometer. His was 98.6. Pooh.
So Taylor, I'm not going to see your babies tomorrow. I will wait until I am better. I took some Ibuprofen and I'm staying in bed. And I still don't feel like crafting.
Saturday, March 15, 2008
Look what showed up in the Sweet Pea Scraps newsletter!
Spotlight on Guest SweetPea Elizabeth Wickland
Hi! My name is Elizabeth Wickland and I am excited to be the guest designer for Sweet Pea Scraps this month! I started out stamping and cardmaking 17 years ago and transitioned into scrapbooking when I got married in December 2000. Scrapbooking is my creative outlet. It keeps me sane! I have a wonderfully supportive husband and beautiful 19 month old daughter who are the subjects of most of my scrapbooking. As a stay at home mom, I try to scrapbook whenever I have the chance, in the evenings or during naptime. I feel blessed to to live in the beautiful state of Montana and draw a lot of inspiration from the colors and patterns in the natural landscape here. All of the seasons are so beautiful and lend themselves to outdoor activities and a proliferation of pictures! Both my husband and I love to take pictures, so there is never a shortage of material to scrapbook. My scrapbooking style is always changing, as I love trying new techniques and learning new things.Do you have any layouts that you would like to do over? Or are you a scrap and leave it kind of girl?? I definitely have layouts I would love to do over! But I rarely get around to redoing them after I'm done. There are just too many layouts to do and too little time! If it's not *perfect* by the time I call it done, it's just not perfect and that's all there is to it!
Describe your scrap space as it is RIGHT NOW! *Embarrassed blush* Couldn't you have asked me that a month ago? Or in a week? You know... when my craft room is clean? Right now it is a COMPLETE mess. I have 3 tables to work on and all three are covered with paper, embellishments, new products, half-done projects. The floor is pretty messy, too... It's bad. 
What is your absolute can't-live-without-must-have item when you scrap?
My computer. Whether it's finding ideas online, looking up events on our family blog (since there's no way I can remember details like when things happened or what we did if I didn't blog!), editing photos, or printing out journaling, there's no way I could scrap without my computer.
Are you a chronological scrapper or whatever strikes your fancy scrapper??
I am most definitely a "whatever strikes my fancy" scrapper! I'm glad, too, or else it would be terribly obvious what struck my fancy and for how long! "Oh... that was the butterfly phase, and here she was into machine stitching, and these six months must have been all about glitter... whoa." By scrapping out of order all of my phases get mixed together and it makes for a more balanced book overall, I think. I usually scrap my favorite pictures first, then go back through and print the pictures I need to finish "event" pages that I need to complete the album. Those are usually the ones that I end up wanting to redo, but don't because the album is finally finished...
I am most definitely a "whatever strikes my fancy" scrapper! I'm glad, too, or else it would be terribly obvious what struck my fancy and for how long! "Oh... that was the butterfly phase, and here she was into machine stitching, and these six months must have been all about glitter... whoa." By scrapping out of order all of my phases get mixed together and it makes for a more balanced book overall, I think. I usually scrap my favorite pictures first, then go back through and print the pictures I need to finish "event" pages that I need to complete the album. Those are usually the ones that I end up wanting to redo, but don't because the album is finally finished...
Wednesday, March 12, 2008
Crackle Paint Wall Hanging - A Tutorial

I've been playing a little more with crackle paint to make some wall hangings for my craft room. I'm really liking how the series is turning out, so I thought I'd share how to make one of your own!
1. For this one I used a 1/4 sheet Hambly overlay as the base, with some red Chatterbox (I think) rubons I got in a RAK.
2. Crackle paint two large playing cards, one with soot black and the other with frayed burlap. Once dried and crackled, distress to remove some of the crackling and reveal bits of the image underneath.
3. Tie red twill ribbon around the black card and layer painted cards on the overlay base.
4. Trace a butterfly onto Asian script paper. Cut out and adhere to black card.
5. Stamp swirls, flowers, hinges, and 'specimen' on burlap card. (Purple Onion Stamps)
6. Punch two holes in the top of the Hambly overlay and set with eyelets. Feed red twill ribbon through eyelets and tie off at the ends to create hanger.
And there you have it! Your own crackle painted wall hanging... If you do this yourself, send me a link so I can see it!
Tuesday, March 11, 2008
Stamped Cards (for MIM technique challenge)
In the spirit of fulfilling my New Year's Resolution, I submitted a card for publication tonight. We'll see if it gets picked up or not, but I am resolved to submit at least one thing every month (except for last month, but I am considering my guest DT spot with SPS as my submission for the month) because if I never submit I will never get published. Right?
But because I can't show you the card I submitted, let me share two others with you. These are the fruits of my Copic coloring last night, and they fulfill my stamping on patterned paper requirements for this week's MIM challenge!


I am really impressed with how vibrant the Copic markers are, even when you color on drab orange patterned paper. It's pretty amazing that the colors don't get muddied in the mix! So in these cards I got to...
1) use my Copic markers! Woohoo!
2) Use my Frolic stamps by Katie Pertiet! Woohoo!
3) Use my new Prima flowers that I bought a couple weeks ago! Woohoo!
That's right... I'm playing with some of the things that I've been wanting to play with. It's nice. Well, Leif is working late tonight, so I'm down to the craft room to play or clean!
But because I can't show you the card I submitted, let me share two others with you. These are the fruits of my Copic coloring last night, and they fulfill my stamping on patterned paper requirements for this week's MIM challenge!
I am really impressed with how vibrant the Copic markers are, even when you color on drab orange patterned paper. It's pretty amazing that the colors don't get muddied in the mix! So in these cards I got to...
1) use my Copic markers! Woohoo!
2) Use my Frolic stamps by Katie Pertiet! Woohoo!
3) Use my new Prima flowers that I bought a couple weeks ago! Woohoo!
That's right... I'm playing with some of the things that I've been wanting to play with. It's nice. Well, Leif is working late tonight, so I'm down to the craft room to play or clean!
15 Minutes

Here's my 15 minute layout! I had the papers, journaling card, and title together (all Tres Jolie) and as I was getting ready to put them away I thought, "You know, I bet I've got pictures that would work with these and it would come together nicely." Sure enough, I did and it did! I ALSO used that Cornish Heritage Farms stamp set I won a while back! Woohoo! I have to admit - I love that smart cling mounting stuff! It's pretty incredible. The best part is that because I've already reorganized all my flowers and most of my stamps, it was really easy to find the items I needed to finish this layout AND I could put them right back where they belong! This was a no mess layout! Woohoo!
It's Technique Tuesday!
Time for another MIM challenge again! This is one I've been wanting to try and haven't yet, so I challenge everyone to...
Again, cards, layouts, mini albums, projects... whatever goes for this, but dig out a stamp or two and stamp on your patterned paper! I've seen people do so many cute things by stamping clothes on patterned paper and cutting them out to use on cards. Or piecing together parts of one image stamped on different patterned papers. So let's see what you come up with!
Stamp on patterned paper!
Again, cards, layouts, mini albums, projects... whatever goes for this, but dig out a stamp or two and stamp on your patterned paper! I've seen people do so many cute things by stamping clothes on patterned paper and cutting them out to use on cards. Or piecing together parts of one image stamped on different patterned papers. So let's see what you come up with!
Variations on a Sketch #3 layout...

Here's what I did with the grid pattern. What did you do? I'd still like to do some cards using the sketch, but for now this is it. The pictures are from Ellie's first Christmas. Come to think of it, I don't even know that I've printed the pictures from this Christmas yet. Some other time, I guess. I do like how this layout turned out, though, especially since I was struggling with how to use these papers and how to scrap the less-than-stellar pictures we got that year. I loved the pictures of Ellie here, but none of them were good focal images. But this design worked well for them! I used my Sweet Pea Scraps December kit and added a few flowers to it.
Monday, March 10, 2008
Wanna know something embarrassing?
I'm still working on reorganizing my craft room. That's not the embarrassing part, though. The embarrassing part is how many toys and tools I'm finding that I just haven't played with yet. Copic markers? Joined the club 2 months ago and still haven't really played. (Though I did order a blender pen from GinaK tonight since I was getting some stamp sets from the new release, too!) Those awesome stamps I won from Cornish Heritage Farms? Yeah... found those, too. The stamps I bought at Hobby Lobby back in January? Filed them away to be played with someday. Cricut Design Studio? Still in the box. It's just pathetic. So many great things to play with, and I've spent so much time designing things for Keepsakes or SPS the last couple months that I have barely had time to play myself. And now that I'm reorganizing, I'm holding myself off from doing big scrapping projects until it's all clean and orderly.
*sigh* I did, however, play a little with my Copic markers tonight for the first time! Wow. Love those markers. I'll write up a little review or something later, but they are GREAT. It's nice to know 2 months (and $50) into the Copic Marker Club I'm glad I joined. I'd hate to have joined and then decided I hated these markers, LOL! But we're good. Whew!
I'll have a few things to show you over the next couple days, but I haven't pulled the pictures off the camera yet, so it'll have to wait. I'll show you my Copic coloring from tonight (and the subsequent cards I put together using my beautious artwork!!) and I've got a couple new layouts to post. One just came together all of a sudden tonight and seriously took 15 minutes while I was cleaning! It was amazing!
Well, I should either go to bed or get back to the reorganization. I'm sort of at a stand still right now with the craft room. I'm trying to figure out...
1. If I want to keep the TV/VCR combo down here and find a place for it, or if I want to put it out of the way somewhere. I've sort of been having fun watching old movies while I'm working.
2. If I'm going to have a full sized computer (including the ginormous old school monitor that is currently in Leif's office) down here once Leif gets the new monitors (yes, plural) for his computer. If so, I need to plan space for that and decide if I want to move the printer as well and just create a little computer corner.
3. If I want to keep my Cricut Expression on the shelf and pull it down when I want to use it, or if I want to put it in the computer corner since it will be hooked up to the computer for design studio work. That is, of course, assuming there will be a computer corner.
4. If there is a computer corner, with or without the Cricut, what do I do with the huge-o radio/CD/double tape deck/record player that I've got here? I think I will have to come to the realization that I've had this for 10 years now and really if I want to listen to music I can just play it off the computer or my mp3 player. It's okay to let go of big things that take up space and collect dust.
So that's sort of where I'm stuck. Once I've got the computer corner and TV sorted out, then I can move on again and try to get everything else into place and put away. It's a big project!!
Friday, March 07, 2008
Product Review: Distress Crackle Paint
Crackle paint comes in all the great ranger distress colors and is sold in a 1.1 oz bottle with applicator brush right in the cap! Unlike other crackle paints, Tim Holtz's crackle paint is a one step process - paint it on, let it dry, and watch it crack. You can speed the process up by heat setting the paint with an embossing gun. It's a great way to add texture and a weathered look to your projects!
When you open the container, the paint seems thick and gloppy. All three of the colors I bought are like this, so I think that's the way it's supposed to be. All you have to do is paint in onto your surface and let it dry. If you're impatient like me, you heat set the paint to make it crackle faster. The paint really does dry quickly, but it seems to take a long time to crackle after it is dry to the touch. It crackles almost immediately if you heat set it.
One of the things I really like about this crackle paint is that you can rough it up with some sand paper and it will fleck off (like real paint does on wood) to reveal the paper underneath. You can paint a couple layers with different colors and distress each layer for a neat effect. It takes a little playing to get the right amount of paint and the right amount of sanding to achieve your desired look, but once you've figured out how the paint goes on and what it looks like crackled at different thicknesses, it's fun to work with.
Overall, I wasn't overwhelmingly impressed with the paint the first couple times I tried it. It didn't look like Tim's when I just painted it on. It didn't go on smoothly and then crackle like I thought it would. But once I started playing with it and familiarizing myself with how it responded in layers and thicknesses I really started to like what I could do with it. So I recommend it. Go ahead and buy it. But play with it first, before putting it on your perfect project, just to save you the heartache if it takes a couple tries to get it to respond exactly the way you want.
For a look at what you can do with these cool crackle paints, check out Tim's blog tutorial on how to make this tag:

Also, I compiled a list of Ideas and Tips based on my own playing:
- Paint it on thicker for larger, deeper cracks
- Paint it on thinner for a smaller, weather worn paint look.
- Let it dry completely for the crackling to appear.
- Heat set the paint to make it crackle quicker.
- Distress crackle paint with sandpaper to remove paint flecks and reveal some of the paper underneath.
- Paint it on the backside of acetate ghost shapes or journaling bits.
- Paint several colors of crackle paint and distress between layers so the colors show through.
- Sprinkle wet crackle paint with glitter for a shabby chic look.
- Stamp on crackle painted surface with StazOn.
- Crackle paint chipboard letters.
- Crackle paint silk or paper flowers for a unique embellishment.
Tuesday, March 04, 2008
Shabby Chic Card Class
I'm sitting here kitting for tomorrow night's class, and I thought I'd share the cards with you. The class is full (my third class of the quarter and all three have been full!!) and we'll be making these four shabby chic cards:


Variations on a Sketch 3
It's time for Variations on a Sketch again! Hard to believe it's March already. But it is, so here's your sketch!! Let's see what you can do with a 4x4 grid....

I'll be back a little later with my projects using this sketch, but here are a few variations to get you started. Use these to create layouts, cards, mini albums - whatever your mind can concoct!


Don't forget to link back so I can see what you did with the sketch!!
I'll be back a little later with my projects using this sketch, but here are a few variations to get you started. Use these to create layouts, cards, mini albums - whatever your mind can concoct!
Don't forget to link back so I can see what you did with the sketch!!
Product Review: Zutter Bind-It-All
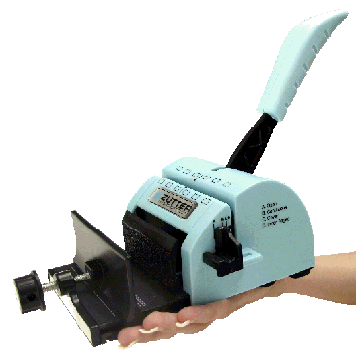 by Elizabeth Wickland
Keepsakes recently received a shipment from Zutter, including their personal binding machine, the Bind-It-All. I'd heard of them before, and heard people rave about them, but didn't have any real interest in one. I assumed they cost hundreds of dollars and weren't something I would use much. I didn't think much about it again, until it was time to bind a project I was working on for the store. So Friday, I tried the Zutter Bind-It-All for the first time.
WOW. First, the Bind-It-All is compact. It's small enough to sit on an out-of-the-way shelf until it's needed, and it doesn't take up a whole table while being used. Second, this little machine does both the punching and the binding, which is nice. Third, it is very easy to use, even without instructions. I have used other binding machines before when I was teaching, and they were not at all intuitive. This little machine is easy to figure out, even the very first time. It has a practically fool-proof slide to adjust the settings and allows for a freestyle sort of punching, continuous punching, and two depth adjusters so you can create books with pages that nestle perfectly inside the covers. I am impressed.
Once I was sold on the functionality of the tool, I reluctantly looked at its price tag. As I said before, I expected it to be hundreds of dollars, simply because most high quality, heavy duty scrapbooking tools are. And this is a high quality, heavy duty scrapbooking tool with a lifetime warranty. But much to my surprise (and delight!) the Bind-It-All retails for about $65, making it an affordable investment!
I originally thought it was something I wouldn't use often, but the more I thought about it, the more uses came to mind. Obviously, it was perfect for mini albums, which I am making a lot of these days. But then I thought... why stop at mini albums? It would be simple to put my scrapbook pages in page protectors, decorate two chipboard covers and bind the whole set together to make my own full-size custom albums! The Bind-It-All works with cardstock, chipboard, acrylic... even as thick as a standard CD.
All in all, I think it's a great product. It was easy to figure out, easy to use, and created a professional-looking binding in seconds. It's a quality tool at a reasonable price . And everyone I know who has one absolutely loves it.

Sheetload of Cards....
Have you heard of 'em? Sheetload of Cards is a free monthly e-zine. They give you a sketch and a supply list and instructions for making SCADS of cards in a very short time. Great if you need to stock up quickly or want to take only a few supplies to a crop and come away with a lot accomplished. At the last Craft Night we were talking about renting the community center for an all day crop or card party (since we have TOO many scraps hanging around that need to be used up!) and this would be a great way to get people started... I got the March e-zine, so I'll have to give it a try, especially since I just got done reorganizing my paper stash and need to use up some of the 8.5x11! I really want to scrap, but I think I've got cards on the brain....
Monday, March 03, 2008
Been cleaning...
... er... reorganizing. Sort of. I can't seem to clean without reorganizing things. I've been that way pretty much my whole life. But anyway.... I've been cleaning the craft room and that's why I haven't been posting. But I'll be back tomorrow with a sketch (at least I plan to... it's sort of a busy day!) so keep an eye out for that!
Saturday, March 01, 2008
Hybrid Birthday Card - MIM Challenge
The MIM wild card challenge this week was to create a hybrid card. To that end, I printed out the frame and sentiment onto a transparency, thinking I could use it on a card somehow. The frame is a freebie I found somewhere and I think it's beautiful! I colored the backside of it with my Copic markers to give it just a little color.
 There's a micro challenge going on right now over at Caardvarks, too. Their challenge is to make a card WITHOUT using patterned paper. Back in the day I'd say "No problem!" and stamp something... but lately I've been much more of a patterned paper user, so this proved a little more challenging! I discovered a sheet of cardstock I bought a while back - brown on one side, teal on the other. And that gave me an idea...
 I cut a frame out of the front of the card, then adhered the transparency using some Iron Orchid Designs from an old Sweet Pea Scraps kit. This particular blue tape I hadn't found a good use for yet, but it turns out that it makes a pretty sweet border! I'm pretty happy with the card and might just make a second out of the remaining half sheet of cardstock.

How are YOUR hybrid cards coming along?
There's a micro challenge going on right now over at Caardvarks, too. Their challenge is to make a card WITHOUT using patterned paper. Back in the day I'd say "No problem!" and stamp something... but lately I've been much more of a patterned paper user, so this proved a little more challenging! I discovered a sheet of cardstock I bought a while back - brown on one side, teal on the other. And that gave me an idea...I cut a frame out of the front of the card, then adhered the transparency using some Iron Orchid Designs from an old Sweet Pea Scraps kit. This particular blue tape I hadn't found a good use for yet, but it turns out that it makes a pretty sweet border! I'm pretty happy with the card and might just make a second out of the remaining half sheet of cardstock.How are YOUR hybrid cards coming along?
Subscribe to:
Posts (Atom)