Sunday, January 13, 2008

Sneak Peek!!

How's the Lace Challenge coming along?? I'll have a new challenge up on Tuesday (it's time for week 3 cards already!), but in the meantime I thought I'd give you a sneak peek of my challenge layout using lace...


Don't forget to leave me a link in the comments so I can see your creations, too! Happy crafting...

Friday, January 11, 2008

Sweet!!

So I got my prize from Julie's blog in the mail yesterday...


... and look at it!! That's a seriously cool prize package! I can't wait to dig in and play with it, though that might just have to wait until I get all my class samples for Keepsakes made... I really should get those done this week.

Thursday, January 10, 2008

A Recent Favorite...

...technique, that is. For the giveaway last week I asked you to share your favorite paper crafting techniques with me. And you did! It's only fair that I do the same for you...

My favorite technique lately has been cutting out the details of a patterned paper and overlapping them onto a photo in the layout. I think it gives a sort of continuity to the design without obscuring the photo too much. And best of all, the only tool you need is a good exacto knife!

Here are a few layouts I've done using this technique:

(All these layouts were done with Sweet Pea Scraps kits. The first one was done with the October '07 kit and the last two with the September '07 kit.)

Tuesday, January 08, 2008

MIM Challenges for 2008

Yes, MIM challenges are finally back!! Here is my general plan:

I will post a new MIM challenge each week. Each week they will follow a certain theme. For example, last week I posted a sketch. The first week of each month I will be posting a new "Variations on a Sketch" for your enjoyment! The second week I will be doing a product challenge. It will go on like that for the four weeks of each month. I will probably be posting these challenges on Tuesdays, since that is the day the year started on, and the day I posted the first sketch challenge! So, while this schedule may be subject to change, here is the general outline:

Week 1 - Variations on a Sketch
Week 2 - Product / Technique Challenge
Week 3 - Card Challenge
Week 4 - Wild Card!!

If you are a card maker, please join us the third week of each month for the challenge!! If you do sketches, check in the first week of each month! Week 4 can be anything and everything - you'll just have to see what my crazy brain comes up with. And Week 2? Well, that is this week, so you'll see that in a moment!

So why am I doing this? For a couple reasons. First, I think it will get me down to my scrap room on a weekly basis, if not more. Creating keeps me sane, and I'd like to be sane a little more often. Second, I want to inspire people! Several people have requested the MIM challenges come back, so I am bringing them back in a slightly different form. Whether you participate every week of every month, or just now and again, I want to see your work!! Leave a comment linking to your creation so I can take a peek!

Now... today's challenge. Product / Technique challenges are designed to get you thinking outside your typical set of materials and techniques. They will pull me out of my comfort zone and I hope pull you out of yours! So your challenge for this week is...

LACE!

I don't know about you, but I have gobs of lace. I just got a giant box of it from Freecycle. It is challenging for me to use, though, so I shy away from it. Not this week!! Your challenge, should you choose to accept it, is to use lace on a card, layout, or project. Be creative!! It doesn't have to be the typical ruffly girly lace... And yes, I'm sure with a little creativity you can even figure out how to use it on a boy page.

So there you have it. I'll be back a while later with a creation of my own to get things going.

Monday, January 07, 2008

Vintage Valentines

A while back Andrea sent me these vintage style playing cards. Ever since, I have been trying to figure out what on earth to do with them. They'd be perfect for altering, but, well... I'm not much of an alter-er. So last night (in my CLEAN craftroom) I pulled them out and saw that there were four of them... perfect for a set of Valentines! I got out some lace from Freecycle (got this box a couple months back and hadn't really done anything with it... until now!) and some stamps, some $pot flowers and buttons. I like how these turned out! I don't really hand out valentines, so I'll probably put them up on Etsy. We'll see. In any event, it was a fun foray into the vintage world. I'm sure I'll be back for a visit.

Not too shabby....

I've been wanting to try my hand at the "shabby chic" look. So last night (in my newly cleaned craft room! that isn't as clean anymore...) I pulled out some OLD paper I don't really like. It's from one of the first stacks, where everything was in the same color scheme (in this case, blue and green) with varying patterns of stripes and flowers. So I pulled out that paper (a sheet of stripe and a sheet of flower) and my box of chipboard (since I'm really bad about using them!) and a box of lace I got from Freecycle, and some paper flowers I got from the Target $pot and I went to town. About an hour or so later I had a 4 card set! I like some better than others, but overall I'm pretty happy with the set. AND I learned new things! I learned that you can color chipboard by just applying chalk with a sponge. Much faster and less messy than using ink or paint! I like the effect, too... subtle, but perfect for this! I also learned that a little Versamark and some embossing powder goes a long way toward coloring chipboard, too (see scallop frame below), and that sanding the edges after you've embossed does neat things. I'll keep playing with techniques, but I had fun last night. Here they are, in no particular order....


I won!!

It's always exciting to win something. And this time I won a RAK from Julie, the Sweet Pea Diva herself! I don't win things very often, so when I checked her blog this morning I was pretty amazed to see my name as the winner. I was so amazed that I read all the comments just to make sure there wasn't another Elizabeth commenting that *really* won. Silly me! But no... it really was me! Yippeee!

Sunday, January 06, 2008

2008 Scrap Resolution....

Last year I resolved to scrap my heart... my real feelings, more than just the date and time and "special" events. And I think I did a good job with that. I definitely made progress in that area. This year I have an entirely different resolution.

In 2008 I resolve to get my work published!

Leif tells me that's more of a goal than a resolution, so I guess the actual resolution is to keep trying, keep submitting, and keep at it until I get published. This one is a little more challenging since it isn't up to me to do the publishing, but it IS up to me to submit! So I worked a little on that tonight. Wish me luck!

Saturday, January 05, 2008

It is nigh unto midnight....

... 11:55 to be exact.

BUT MY CRAFT ROOM IS CLEAN!!!

Whew! It only took a day and a half! I told you it was messy. I had to take a little break this afternoon so I could go to the LSS and pick up my DT stuff for my open house / upcoming class displays. That took a while, but then I was back at it. And now I'm done! Except for the vacuuming, but I think Roomba is down there right now helping me with that one... tee hee!

Okay, so the only reason any of you are still reading is because you want to know who the winner is... well, without further delay, the winner is:


NATHALIA!!!


She left the last comment before I started this post, so there will be something special going out in the mail to her!! Congrats!!

Thanks to everyone who commented... it was great motivation! Hope you enjoyed playing...

Getting Close!!

I'm getting closer!! In fact, I'm hopeful I can get it done tonight, so long as I remember that it doesn't have to be *perfect* - just picked up and clean!! I will need to rearrange and reorganize my shelves at some point, but tonight is not the night... So for now I will just keep that the way it is and keep plugging to clean up...

I think I can... I think I can... I think I can....

(Don't forget to leave a comment here for the chance to win something from me! It'll be extra special since it's taking so long... *grin* )

GIVEAWAY!!!

So... yesterday I said that when my craft room is clean, I'll have a giveaway! Well, it hasn't happened yet, but I hope to have it clean soon. So to provide me with a little more incentive, we'll have a little game. Here's how it works....

Leave me a comment. How about leave me a comment telling me a favorite paper art technique. You can leave as many comments as you'd like, but the last person to leave a comment when my craft room is clean gets a handcrafted goodie from me!

It's sort of like musical chairs... you never know when the music stops, but when it does, you want to be the last person to have commented!!

I'll leave this post at the top of the page and maybe sometime today, or tomorrow, or by the end of the weekend, we'll see who wins!! Now let's get the fun started... Who's first?

UPDATE: It is now 10 pm and I'm still working on this room of mine... I can see most of all 3 craft tables (though none of the card table or side table... ergh), so I've definitely made a lot of progress today. But I will have to continue tomorrow, so keep the comments coming!! This time tell me what your favorite scrapbooking/papercrafting tool is! (Remember, you can post more than once... as many times as you want! The goal is to be the last person to post before my craft room is clean!)

Thursday, January 03, 2008

Valentine's Day Cards...

Valentine's Day is just around the corner, so I wanted to share some card sets I made a while back. I actually had these made for the craft show back in October, but am just now getting them up.

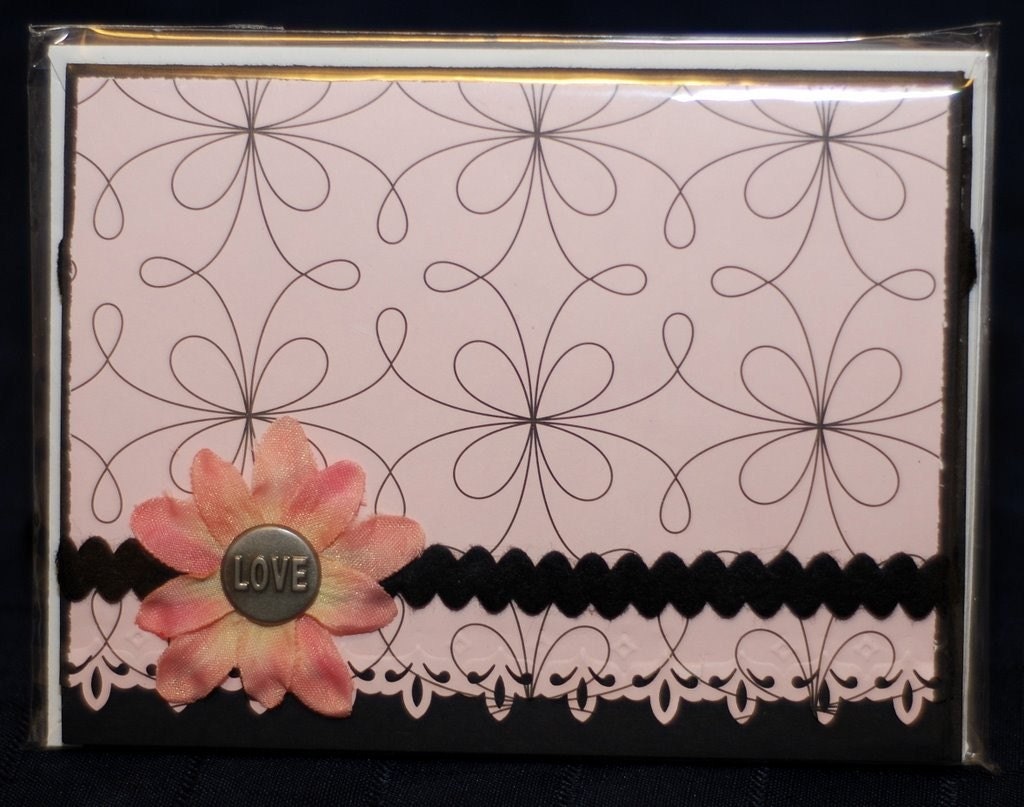
The first card set is my favorite. The paper comes from RoShamBo, my favorite paperie! I don't get in there too often, but when I do it is MARVELOUS. I could waste an entire afternoon in there, just browsing through all of the wonderful things. I used some shimmery spray from LuminArte on the flower to give it some "glow" and I centered it with a "love" embossed brad. The bottom front edge is scalloped, punched with my Fiskars embossing border punch.

This second card set is Rhonna Farrer all the way! The felt ribbon is from her Christmas line and the "love" stamp is also hers, both through Autumn Leaves. The sentiment is covered in red glitter, and the felt border is also accented with glitter.
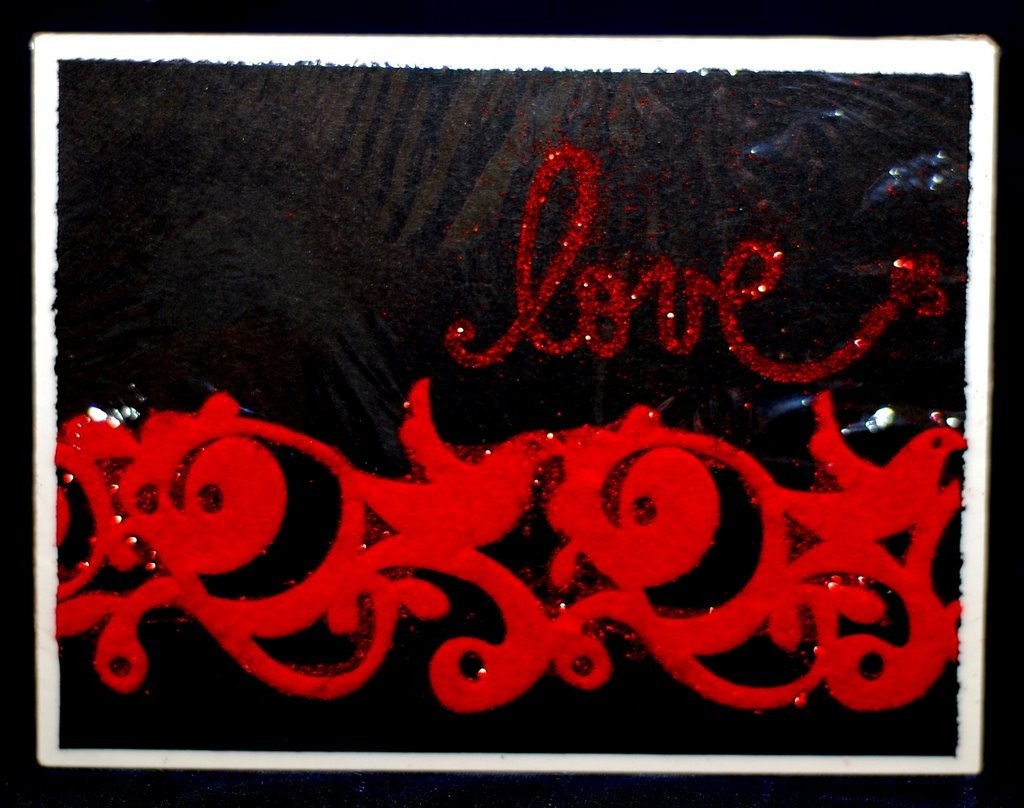

Both of these cards come in sets of 4 and are up on Wickland Papercrafts in time for Valentine's Day!

Okay... off to work on cleaning my craft room some more. Once it's finished we'll all celebrate with a giveaway!! So cheer me on...

Tuesday, January 01, 2008

HAPPY NEW YEAR!! - Variations on a Sketch #1

Here is the first of what I hope will be a series of My Inner Martha sketches for this year. I'm calling it variations on a sketch and giving you two or three variations of the same sketch, modified for single and double page layouts.

So here she is, ladies and gentlemen.... MIM Sketch #1:

Variation A:

Variation B:

Variation C:


And my take on the sketch:


Now... have fun and play with it! Because this sketch is adaptable to 12x12 or 8.5x11, single or multiple photo, and double or single page layouts, you should be able to find some way to use it! When you're finished, leave me a link in the comments so I can come see! Happy scrapping!

Sunday, December 30, 2007

Prioritizing...

My stack of layouts outgrew its home, so I decided it was time to find albums for some of those layouts. I still have some layouts I need to retrieve from Keepsakes, but for the most part I've got Ellie's 2006 album done. Or so I thought. I sort of forgot about my list of layouts to do. So for now, these layouts are bumped up to priority 1:
  • 3 months
  • 4 months
  • 5 months
  • Meeting Uncle Robert
  • Tummy Time
  • Fall Leaf Pictures
  • Mirror Mirror on the Wall
  • Mobile Watcher
  • Ellie in the Air at the Concert in Big Sky
  • Smirk
  • Mommom and Poppy's Last Morning
  • Why we chose cloth diapers
  • First hospital pictures
  • Burrito Baby
  • Helping Mommy Unpack in TX
  • Reading with Poppy
  • Playing with Mommom in TX
  • Ellie's first ride in a small plane
  • Sleep in Heavenly Peace
  • First Solid Food
  • Naughty or Nice
  • Ellie with Grandmas
  • So this is love

Favorite Recent Scraplifts

People have differing opinions on scraplifting. I, personally, am of the opinion that so long as I don't claim others' ideas as my own, it's okay. Scrapbooking for me is about preserving my memories in a beautiful and creative way. Sometimes the creative juices aren't there, so I look to others for inspiration. Other times I see a layout that I have perfect papers and photos for, so I use that layout as a starting point. Sometimes my final project diverges quite a bit from the original I lifted. Other times my layout ends up being basically the same. I'm okay with that. And I'm flattered when someone else wants to use my work to inspire their own creativity. So, in the spirit of scraplifting, here are some of my favorite recent scraplifts:

This one is lifted from a magazine. I don't remember which one, and I'm too lazy to wander down to the craft room and check. So for now we'll just say that I got this idea out of a magazine and call it good. =D

This layout idea I got from the Sweet Pea Scraps gallery. I always look through the gallery when I get my new kit so I can see what cool things the DT members did with their kits before I break into mine. This particular layout was scraplifted from Jenn Claar's, whom I happen to be on the DT at Keepsakes with! And while I didn't intend for mine to turn out so much like hers, they look pretty much the same. And I love how it turned out!

This layout was lifted off 2ps. The original was a digital layout, but I thought it would be perfect for this photo. And so it was! I pulled out my paper and glue and this is what I came up with!

This last lift is also from 2ps. Sometimes when I need a basic idea for a layout I will turn to my Book of Scraps and look at the layouts I have filed under "__ number of photos." In this case, I looked under single photo layouts and found this one, which I thought was great! When I combined the design with the October SPS kit and the photo, it all just went together perfectly.

So I won't be submitting any of these for publication - they're not my own original ideas. But I will put them in my albums and cherish the memories these pages hold. I will also be thankful that others are willing to share their artwork with me so that I may find inspiration in their work and have beautiful pages, too.

Saturday, December 29, 2007

Another Challenge...


Another one of the challenges over at Sweet Pea Scraps was to make a transparency card. I have been wanting to do this, so tonight I sat down and got to work on it. And I like it!! It's very wintery and I like the blue/brown combo with the snowflakes. For more pictures of it, go to my 2ps gallery here.

Thursday, December 27, 2007

Scrappin' Again!

So despite the utter destruction of the craft room, I got some scrapping done tonight. I'm participating in a couple challenges with this entry, but mostly I'm happy that I finally got a little more scrapping in!


The first challenge is to scrap a layout about any New Years Goals (or Resolutions!) that you have for yourself for 2008. The second challenge is to create a 2-page layout, any size, about you. Journal your thoughts, your dreams, your accomplishments. Or... make it a layout about your 2008 goals and/or dreams. So... I decided to kill two birds with one stone and call it all my creative processing since, for the first time in a long time, I actually have a resolution this year! The journaling reads:

She is a toddler and I am her Mommy.
At 17 months old she imitates everything.
Everything I do and everything I say
is seen by her little blue eyes
and shapes who she becomes.
I am her model of compassion
and faith and patience and love.
I am her example of what is right and wrong.
From me she learns how to speak to those around her
and how to act when things don't go her way
and how to believe in a God who is bigger than all of us.
Who I am shapes who she will become and so I resolve in 2008 to live deliberately.
I resolve to model for my daughter words that are thought through before they are spoken,
actions whose consequences have been weighed before they are done,
and a life that is lived before her on purpose.
The way I live my life shapes the way she will live hers. And so I resolve to live deliberately
because I am the one she imitates.

New Items!!

I've got some new items up in my etsy store! It's been a while, so I'm getting some Valentine's day stuff listed. There will be card sets soon, but these are up now and a new item altogether for me:


I made them for the craft fair in October and then never got around to listing them on etsy until now. I thought the pink ones were good for Valentine's Day and the blue and green one is just, well, fun! I'm hoping to get the cards and other notebooks listed soon. In the meantime, these are the newbies!!

Monday, December 24, 2007

Tag - You're it!!

I've been tagged!! Thanks, Sandy! Here's how it works:

  • Link to the person that tagged you and post the rules on your blog.
  • Share 7 random and/or weird facts about yourself on your blog, we all want to know them.
  • Tag 7 random people at the end of your post and include links to their blogs.
  • Let each person know that they have been tagged by leaving a comment on their blog.
So let's see... 7 random weird facts about me:

  1. Before my daughter was born I spent 3 years teaching Latin - a job I was hired for without actually knowing any Latin. (And yes, I'm talking about the language, and yes, I did learn it.)
  2. My middle name is Bitikofer. 'Twas once my maiden name, but when I got married I ditched the mid' in favor of the maid' name. (My middle name WAS Ann.)
  3. I'm somewhat synesthetic though until recently I'd always just assumed it was an overactive imagination. I also thought everyone was like that until my husband told me he thought it was weird that I associated colors and sounds...
  4. When I was in college I took a class in aviation and one in computer programming just for fun. (I was an English major) I got high A's in both classes.
  5. I always wanted to be a gift wrapper for Neiman Marcus. I love wrapping gifts.
  6. I am a nerdy sci-fi junkie and my favorite shows (Farscape, Firefly, BSG) are sci-fi. I've seen the entire Farscape series (4 seasons and the miniseries) at least 5 times through. (It's sort of embarrassing.)
  7. Until about 2 years ago, I couldn't wink my left eye. I tried for years and could only blink both eyes if I tried. I could wink my right eye, just not my left. Then I went to the dentist and they numbed my mouth, all the way up to my right eye!! I had to manually blink my eye (I poked myself in the eye so many times that day!) and the anesthesia took forever to wear off, but when it did I could wink my left eye. And I've been able to ever since!
Okay... there are my weird secrets. Now... how 'bout yours? I tag these seven people....

Jaime, Dana, Tam, Lauren, SusanBeth, Andrea, and Claudine!

Tag... you're it!

Saturday, December 22, 2007

Starting off with a BANG!

To celebrate the new year, My Inner Martha challenges will be BACK! I have had a couple requests for them and decided that the new year was the perfect time for their return! I haven't figured out all the details yet, but wanted to let you know that you can look forward to them! It's gonna be good...

Thursday, December 20, 2007

CD Label Tutorial

A few weeks ago I mentioned that I burned a DVD of photos and videos to give my grandparents for Christmas. One of my favorite things about it, though, was that I figured out an easy way to make labels for CDs and DVDs! I know you can buy the ones you run through your printer, but I want to be able to tailor them to a specific project. So here's how I did it...

1. Choose a piece of patterned paper (not the cardstock weight). Using your circle cutter, cut a 4.5 inch diameter circle. Then cut a 1.75 inch circle from the very center so you have a ring. (One of the things I like about my Curvy Cutter is that I can adjust the cutter without moving my paper or the track - it makes cutting rings super easy!)


2. Stamp your design on the patterned paper. I have been using a lot of this Autumn Leaves flourish - it fits perfectly three times around! Add any hand doodling or labeling at this point. **Make sure you don't use any dimensional products (such as embossing or heavy paint) in your stamping or writing. They will throw the balance off the CD/DVD and can potentially ruin your disc and/or machine!**


3. Run your finished design through a Xyron so that it is sticky on one side. If you choose an alternate adhesive for your label, make sure that it provides thin, even coverage so the disc is not thrown off balance and the label doesn't get stuck in the player.


4. Peel off the backing and adhere the label to your disc. Congratulations!! You're done! How easy was that??


As mentioned before, DVDs/CDs fit perfectly in the back of a paper bag album. If you don't know how to make them, or don't want to take the time, you can always get one (or have a custom one made) at Wickland PaperCrafts. (yes, that was a shameless plug)


They make great gifts (last minute Christmas gifts, anyone??) and are easy to mail. Especially since I found these cool bubble mailers at Walmart that are the PERFECT size:

Peppernuts!

Christmas is just not the same without peppernuts. They're little German spice cookies my grandmother always used to make. They're perfect for dunking in coffee and great by the handful. And Christmas is just not the same without them. So... today is Peppernut Day! I started making them yesterday, let them freeze overnight, and baked them this morning. Well, I baked half of them. The other half will have to wait until later because I have plans in a little over an hour and I don't want to pull out the other pan of frozen dough. There are dozens of recipes for peppernuts, and it seems that every Mennonite family has their own version. I've tried a couple other varieties, but nothing beats what *I* know to be peppernuts: 1 C. shortening 1 C. white sugar 1 C. butter 1 C. evaporated milk 2 C. brown sugar 1 egg Mix ingredients together. Add in: 1 tsp each: salt black pepper cinnamon nutmeg ginger baking powder baking soda 1/2 tsp each: allspice cloves anise oil 6-7 C. flour The dough will be thick, kind of like gingerbread. Refrigerate dough until chilled through. Roll chilled dough into long 3/4 inch diameter ropes. Freeze. Cut ropes into 1/4 inch cookies and place on baking sheets. Bake at 350 degrees for 8-10 minutes. Makes a few hundred cookies... That are perfect for gift giving!! Wrap them up in the cutest way you can think of and hand out to everyone you know!!

Wednesday, December 19, 2007

Quick Christmas Gift


I was inspired by something I saw on another blog (which, sadly, I cannot find now) and decided to put together a quick little Christmas gift this afternoon. It's a simple notepad and pen holder with a pocket in the front flap. The notepad slips out so it can be refilled; a feature I thought was most helpful. I think I'll work on perfecting my design, but it was fun and quick. AND I got to use one of my cute ribbon flowers from Wickland PaperCrafts. I hope the recipient likes it. Happy Crafting!!

Tuesday, December 18, 2007

PIF-ers

Goodies will go out soon to the next two players....

TAMARA and BETH!!

I got your packages all ready to go, so I hope you enjoy!! Thanks for playing!

Progress

Well, I'm making progress. I got some scrapping done in TX and I scrapped at Craft Night last night, so here is the updated list:

2005
  • Crystal Flowers

2006

  • DONE! That frown
  • DONE! First Plane Ride
  • Meeting Uncle Robert
  • Tummy Time
  • Fall Leaf Pictures
  • Good morning Sunshine!
  • Little Angel
  • Mirror Mirror on the Wall
  • Mobile Watcher
  • Ellie in the Air at the Concert in Big Sky
  • Smirk
  • DONE! Screaming Foot at the Camera (Mad Little Girl)
  • Mommom and Poppy's Last Morning
  • Labor
  • Why we chose cloth diapers
  • First hospital pictures
  • Burrito Baby
  • Helping Mommy Unpack in TX
  • Reading with Poppy
  • Playing with Mommom in TX
  • Ellie's first ride in a small plane
  • Sleep in Heavenly Peace
  • DONE! It was a Merry Christmas Indeed
  • First Solid Food
  • Naughty or Nice
  • Contractions!
  • TX Christmas
  • Ellie with Grandmas
  • So this is love
  • The world awaits
  • Great Minds Think Alike
  • Bar 3 BBQ with Dave and Tam
  • DONE! Teaching Latin

2007
  • DONE! Trick or Treating
  • DONE! Ellie's Fairy Costume
  • DONE! You are my dream come true
  • Car Accident*
  • Climbing to turn off the light
  • DONE! Fall Family Pictures
  • DONE! Conversation with Ellie about playing in my purse (titled: "you said")
  • Hat love
  • DONE! Mistress Mary
  • DONE! Leaves
  • Cheesy Grin (Say cheese?)
  • Peas - IN PROGRESS
  • Rocky Creek Farm*
  • Apple Eating
  • Ellie's First Trip to Yellowstone*
  • Grand Prismatic Spring*
  • Words (for various months)*
  • DONE! Reading to Ellie (Reading with Daddy)
  • READ (scraplift with Ellie in rocking chair)*
  • Ellie needs cookies
  • DONE! Grotto Falls in the Fall (Hyalite Creek Trail)
  • Hyalite Reservoir in the Fog*
  • Little Monster*
  • Ellie with Grammee and Grandad*
  • Uncle Rob and Ellie*
  • DONE! Run Run Run! (Sweater Weather)
  • DONE! Montana Girl (Montana Beauty)
  • Ellie BELLY!
  • Nicknames
  • DONE! Ellie and Grandad
  • Early September
  • Class Reunion*
  • The Tweaksters
  • DONE! Dance (She's got music in her soul?)
  • Hiking with Ellie (Lava Lake pictures)*
  • MSU Duck Pond*
  • Turkey Leg!!*
  • Papa-razzi*
  • My Shadow (poem)*
  • Blue Angels*
  • Ellie's Kitty*
  • Need for Speed (ski boat pictures)*
  • Angler (I love MT)*
  • Dara's Wedding*
  • Cliff Lake*
  • Kayak Ride*
  • Ellie and Mommom*
  • 12 month stats*
  • 15 month stats*
  • The look.*
  • Let Her Eat Cake!*
  • Birthday Suit*
  • 1st Birthday*
  • Birthday Party*
  • 4th of July*
  • Ousel Falls*
  • Patriot Baby*
  • 1st Trip to the Zoo*
  • Bedhead!*
  • Playing the Piano with Lily*
  • Palisade Falls*
  • Fairy Slipper Orchid*
  • Little Mover
  • 9 month stats(*?)
  • Sandpoint with LU folk*
  • Li'l Friends Outfit
  • Drooling Machine
  • Smiley Girl on Maroon Pillows
  • Musical Table Love
  • Piano Player
  • KhKhKh
  • Christmas Coats*
  • Push Ups*
  • My Valentine*
  • Cry Baby*
  • Stolen Keys*
  • How was your breakfast?*
  • Sandpoint with the Claridges*
  • DONE! Walker in TX (i *heart* walkers)
  • Salpingectomy/The Unexpected
  • Ellie and Mommom at Easter
  • Dopey McDopester
  • DONE! TV Addict
  • In the Yard
  • Lily
  • Broken Plant
  • Peek-a-Boo!
  • Vanity
  • Wii!
  • Curiosity
  • I know I'm cute!
  • Play with me Daddy
  • Pulling Up
  • DONE! Mommy and Ellie at the Gallatin River
  • DONE! My Pumpkin
  • DONE! Ellie and Daddy at the Gallatin River
  • DONE! Ellie and Mommy Swinging
  • DONE! Bogert Park

Projects
  • Ellie's baby book - IN PROGRESS
  • Fall Family Picture Mini Album (I think)
  • Finish Weight Loss Album from this summer
  • Ellie's Friends Mini Album
  • DONE! Pregnancy Album

Monday, December 17, 2007

Christmas Card Tutorial

These are our Christmas cards this year, and as an added bit of Christmas cheer, I thought I'd share instructions on how to make them! The instructions and supplies below will make 12 cards. Merry Christmas!!


What you need:
  • 2 sheets Hambly Frosty Snowflakes overlay
  • 3 sheets snowflake patterned paper (I used a spotted plaid) 12x12 (any)
  • 6 black and white 4x6 photographs
  • 2 yards medium width ribbon
  • 12 of each small letter needed to spell "snow" (any letter types - brads, stickers, die cut will do)
  • 3 sheets (or more as needed) printer paper
What you do:
  • Cut each overlay into 6 panels measuring 4x6 inches.
  • Cut each sheet of patterned paper into 4 panels measuring 4x8 inches. (hint: cut a 4 inch swath across the bottom of the paper and trim it to 8 inches, then cut the remaining paper into thirds.)
  • Print your letter or greeting in a text box measuring 4x5.5 inches. (You should be able to fit four on a sheet of printer paper and cut them apart.)
  • Glue your letter to the patterned paper panel approximately 1/2 inch from the top.
  • Layer your photo and overlay panel on top of the letter, also 1/2 inch from the top of the card.


  • Punch two holes in the top of the layers, approximately 1 inch apart.
  • Thread 6 inches of ribbon through the holes as desired. Trim ends on the diagonal.
  • Adhere letters "SNOW" to the bottom of the card

These instructions make 12 cards and can easily be doubled or tripled for more! Cards fit into a business size (No. 10) envelope for mailing and do not require extra postage unless you used dimensional letters. As with all handmade cards, if you are unsure of the need for extra postage, ask your post office. I had mine hand canceled (which costs a little extra) to ensure they wouldn't get torn up in the mail and they arrived beautifully!

When the cards are all said and done, you will be left with 3 4x4 squares of snowflake paper. Use them to make a few gift tags or enclosures to spruce up your gifts this year!

Sunday, December 16, 2007

Pay It Forward

Anyone wanna play?? Here's how it works...

Leave me a comment saying you want to play. From the comments, I will pick 2 to send a goodie package to! In return, once you receive your goodies, you post a PIF on your own blog and choose 2 people to send goodies to!

I received my PIF goodies today from Melissa including Christmas stamps, epoxy stickers, and ribbons. Thank you!! Thank you!! And tonight I'm gathering goodies for the next 2 players...

It's the holidays... so come on and share the love!

Friday, November 30, 2007

Headin' South...

Well, tomorrow Ellie and I are heading to TX for 2 weeks. I'm not taking my computer and I'll be the mercy of my parents' dial-up connection, so this may be the last you see of me for a while. (Except for you Longview-ites, but we'll get to you in a minute.) I'm hoping to backlog a few blog posts so I can just publish them while I'm down south, but we'll see how much I get done today and whether or not that happens. In the meantime, here is the layout I did of Ellie's FIRST trip to TX last October. I had a third picture with a close up of the hidden journaling, but I accidentally deleted it, so you'll just have to remember reading about it from last year instead. =D


Now... for all you Longview-ites... I'll be in Texas for 2 weeks. Wanna play?? Email me and we'll make plans!