Showing posts with label product reviews. Show all posts

Saturday, May 24, 2008

Cricut Design Studio - Product Review

A number of months ago I purchased the Cricut Design Studio software to use with my Cricut Expression. I found it for a good price (though I have since seen it on clearance at Joann's for much cheaper!) and was excited to have it. I delayed installing it on my laptop, since it had overheating issues and I was sure CDS would be too much for the sick laptop to handle. A month and a half ago or so I finally got a computer down in my craft room (woohoo!) and just recently I got a new laptop that doesn't overheat and shut down several times a day. So last night, for the first time ever, I pulled the Design Studio out of the box and installed it on my computer in the basement!

I played and cut with it some last night, just a little bit. There are some HUGE advantages to using the CDS software over just your Cricut. First, you can see exactly what you are cutting and where, so there's no guesswork as to paper placement on your cutting mat. That is wonderful! You can really make the best use of your paper by arranging things where you want them and making sure that they line up just right on your paper. You can stick down several different papers in different places on the mat and design accordingly so you can make all your cuts at once from a few different papers. You can also weld letters together to make words, which is great! That's a feature I plan on using a lot. Actually, I plan to do all my designing and cutting from the computer now, since it is so much easier than using the touchpad and screen on the Cricut!

Unfortunately, just in my first hour of playing with the CDS software, it's obvious that there are some areas that could use some serious improvement. It would be great if there was a way to erase lines you didn't want cut, or to fill in frames that you've made so they are just solid blocks. Right now I can't figure out a way to do either. There are also a few things they could do to make maneuvering the cuts on the mat a little easier. But all told, it's pretty good.

So far I'm enjoying playing with it. I made my first real "project" with the Cricut and Design Studio today, so hopefully I can get pictures of it up soon. It's pretty simple, but I did it all in one cut, and I'm pleased with how it turned out. And that's always good, right?

Friday, March 07, 2008

Product Review: Distress Crackle Paint

Crackle paint has finally arrived at our LSS, so I took the opportunity to buy a couple colors and try them. I've seen how cool Tim Holtz makes this stuff look on things and I couldn't wait to give it a whirl!

Crackle paint comes in all the great ranger distress colors and is sold in a 1.1 oz bottle with applicator brush right in the cap! Unlike other crackle paints, Tim Holtz's crackle paint is a one step process - paint it on, let it dry, and watch it crack. You can speed the process up by heat setting the paint with an embossing gun. It's a great way to add texture and a weathered look to your projects!

When you open the container, the paint seems thick and gloppy. All three of the colors I bought are like this, so I think that's the way it's supposed to be. All you have to do is paint in onto your surface and let it dry. If you're impatient like me, you heat set the paint to make it crackle faster. The paint really does dry quickly, but it seems to take a long time to crackle after it is dry to the touch. It crackles almost immediately if you heat set it.

One of the things I really like about this crackle paint is that you can rough it up with some sand paper and it will fleck off (like real paint does on wood) to reveal the paper underneath. You can paint a couple layers with different colors and distress each layer for a neat effect. It takes a little playing to get the right amount of paint and the right amount of sanding to achieve your desired look, but once you've figured out how the paint goes on and what it looks like crackled at different thicknesses, it's fun to work with.

Overall, I wasn't overwhelmingly impressed with the paint the first couple times I tried it. It didn't look like Tim's when I just painted it on. It didn't go on smoothly and then crackle like I thought it would. But once I started playing with it and familiarizing myself with how it responded in layers and thicknesses I really started to like what I could do with it. So I recommend it. Go ahead and buy it. But play with it first, before putting it on your perfect project, just to save you the heartache if it takes a couple tries to get it to respond exactly the way you want.

For a look at what you can do with these cool crackle paints, check out Tim's blog tutorial on how to make this tag:


Also, I compiled a list of Ideas and Tips based on my own playing:
  • Paint it on thicker for larger, deeper cracks
  • Paint it on thinner for a smaller, weather worn paint look.
  • Let it dry completely for the crackling to appear.
  • Heat set the paint to make it crackle quicker.
  • Distress crackle paint with sandpaper to remove paint flecks and reveal some of the paper underneath.
  • Paint it on the backside of acetate ghost shapes or journaling bits.
  • Paint several colors of crackle paint and distress between layers so the colors show through.
  • Sprinkle wet crackle paint with glitter for a shabby chic look.
  • Stamp on crackle painted surface with StazOn.
  • Crackle paint chipboard letters.
  • Crackle paint silk or paper flowers for a unique embellishment.

Tuesday, March 04, 2008

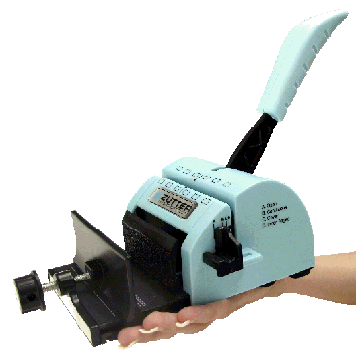
Product Review: Zutter Bind-It-All

by Elizabeth Wickland

Keepsakes recently received a shipment from Zutter, including their personal binding machine, the Bind-It-All. I'd heard of them before, and heard people rave about them, but didn't have any real interest in one. I assumed they cost hundreds of dollars and weren't something I would use much. I didn't think much about it again, until it was time to bind a project I was working on for the store. So Friday, I tried the Zutter Bind-It-All for the first time.

WOW. First, the Bind-It-All is compact. It's small enough to sit on an out-of-the-way shelf until it's needed, and it doesn't take up a whole table while being used. Second, this little machine does both the punching and the binding, which is nice. Third, it is very easy to use, even without instructions. I have used other binding machines before when I was teaching, and they were not at all intuitive. This little machine is easy to figure out, even the very first time. It has a practically fool-proof slide to adjust the settings and allows for a freestyle sort of punching, continuous punching, and two depth adjusters so you can create books with pages that nestle perfectly inside the covers. I am impressed.

Once I was sold on the functionality of the tool, I reluctantly looked at its price tag. As I said before, I expected it to be hundreds of dollars, simply because most high quality, heavy duty scrapbooking tools are. And this is a high quality, heavy duty scrapbooking tool with a lifetime warranty. But much to my surprise (and delight!) the Bind-It-All retails for about $65, making it an affordable investment!

I originally thought it was something I wouldn't use often, but the more I thought about it, the more uses came to mind. Obviously, it was perfect for mini albums, which I am making a lot of these days. But then I thought... why stop at mini albums? It would be simple to put my scrapbook pages in page protectors, decorate two chipboard covers and bind the whole set together to make my own full-size custom albums! The Bind-It-All works with cardstock, chipboard, acrylic... even as thick as a standard CD.

All in all, I think it's a great product. It was easy to figure out, easy to use, and created a professional-looking binding in seconds. It's a quality tool at a reasonable price . And everyone I know who has one absolutely loves it.

Sunday, February 10, 2008

Have you heard of them?

Today I came across a blog I've never seen before. It's Craft Critique. Have you heard of them? I hadn't. But I looked at their blog and it's different from most of the ones I read... it's like a giant scrapbooking product review site! I'm adding it to my reader and looking forward to seeing what they have to say about the new products revealed at CHA this week.

Monday, November 19, 2007

Unmounting Stampin' Up! Stamps...

The unmounting project is coming along nicely, though it did interfere a little with my concentration on Thanksgiving prep earlier today!! As has been suggested by several people, I followed this method of unmounting my Stampin' Up! stamps. For most of my wood mounted stamps, the red rubber peels right off the foam mount with no problem. Stampin' Up! stamps are stuck on there pretty well, though. I suppose it's a sign of quality, but when you're unmounting them it's a sign of impending frustration. I don't know yet how I feel about keeping the foam mount attached to the red rubber, but I don't suppose it will be much of a problem, and I'm doing it for now. I'm down to the last few that need to be unmounted, and then I can work on getting them all stickified with Tack It, sorted, filed, and put away!

As an added note, when I ran out of Tack It I went to Joanns to get more. Wouldn't you know, they didn't have it. So I got the Zig 2-Way glue instead, as I've heard it can be used for the same thing. While I appreciate it's application better (chisel tip pen style applicator), it just doesn't have the same "oomph" when it comes to the temporary hold. So I'll put that glue in my bag to take to crops and whatnot, but I think I'm an official Aileene's dedicatee.